Fixed Asset Pro 16 User Manual
documentation version 3.5
Introduction
- Product Name : Fixed Asset Pro 16
- Product Version : v 3.5
- Purchase : https://www.excelsoft.com/product-package/product2-fixed-asset-pro-16.html
- FAQ : https://www.excelsoft.com/help2-fixed-asset-pro-16.html
- Download Free Trial : Download
ExcelSoft® Fixed Asset Pro 16 is designed to comprehensively manage, maintain, and control your business assets with easy navigation and intuitive control. This is simply a business application tool that every business must have. Everything is now at your fingertips! Easily record and keep track of your individual asset from its acquisition, depreciation, asset service requirement, historical service records, asset custodian, and warranty claims. Our product features a very user-friendly environment and an easy-to-navigate TreeView. Users can easily group, sort and access the status with single click. There is also a built-in integrated screen for easy access and viewing, complete with pictures and breakdowns of each categories. It is fully compliant with International Accounting Standard under Property, Plant and Equipment (IAS16 - PPE).
Main features
Main features on application:- * Complete recording of purchase price and date, service date, warranty date, asset class, cost group, custodian, vendor, department, provider, photo, component breakdown, tagging, etc. For tracking purposes, you can also tag ID and photo for asset breakdown for tracking.
- * Allows two depreciation methods for each asset, fiscal and calendar.
- * Compliance with the International Accounting Standard (IAS16).
- * Allow assignment of Warranty, tagging to service maintenance.
- * More than 100 pre-formatted reports available for you to manage your assets. You can sort and group the reports in various ways before printing or download them into Microsoft Excel format for analysis.
- * Automatic creation of journal Entry for Depreciation, Asset Disposal, Asset Revaluation, Asset Write off and Asset Transfer.
- * Asset can be transferred, disposed, written off, or revalued. System generates all standard journals complete with account number. System supports multi-branch transfers, multiple entities, and multi-user.
- * Generates journal entries (user can setup journal account for General ledger interface purposes).
What's new in Version 3.5?
To meet user needs, Excelsoft Technology always strive to design and carry out development to facilitate users assets data collection. By always a relationship with users and get feedback problems that exist in the user Excelsoft Technology is always developing in Fixed Asset Pro 16.
The development carried out since last year, including:- Import data from Microsoft Excel made more interactive.
- Replication assets already in the database easier.
- The addition of the calculation of depreciation of assets that we call "Annualized Straight Line", and others.
These are some of the extras that we updated at the beginning of this year. We will always communicate and receive all the suggestions that have been given by the user.
This document shows how to use Fixed Asset Pro 16. The application can be downloaded here
Getting Started #back to top
This part of the manual shows you how to install and uninstall Fixed Asset Pro 16.
Installation guide
-
Download the installer (if you have not done so, download it here). The application comes in two versions:
- The free trial version, in which it allows you to try the application for free for 90 days before requiring you to purchase a license
- The paid version, in which you obtain the license immediately and can be used indefinitely. The paid version offers many purchasing plans for various company purposes.
- Run the installer. If the Windows UAC dialog box pops up, click on Yes.
- Follow the instructions on-screen.
Activation
After installing the application, run the application. If this is your first time running the application, you will be told to activate it. Choose whether you want the free trial version or purchase license for the paid version (for more information, see the previous section). Then, follow the instructions on-screen to get your application activated.
Free trial- Select Activation Trial Version from the software activation dialog box, then enter your e-mail address.
- Click OK for the next two dialog boxes.
- Check your e-mail inbox for the activation link sent to your e-mail. Fill in the application form and click on the Activate button when done.
- Restart the application.
You can purchase a license anytime by clicking Help on the menu bar, then selecting Activate Product.
Purchasing a licenseYou can opt to purchase a license instead. You can do this by purchasing a license from https://www.excelsoft.com/product-package/product2-fixed-asset-pro-16.html (this site can be accessed by clicking Purchase Now on the software activation dialog box), then activating it in the Activating Purchase License dialog box by simply entering your e-mail.
Alternatively, you can get the license by phone, and the activation key will be e-mailed to you. You can then select to activate by phone, and enter the details e-mailed to you.
Logging in
Done activating the software? Good. Now let's put it into good use. You will soon see a login screen like this:

For now, you will need to know that the default user ID is 001 and the default password is 01, in order to log in to the system. You can change them later in the application (see the section on Utility/Edit Security Admin).
Uninstallation guide
If you do not like the app, you can uninstall it by one of these methods. We assume that you are using Windows 10. If you use a different version of Windows, these methods may vary slightly.
From the Control Panel- Open the Control Panel. This can be done by searching for "Control Panel" in the search bar.
- Open the Programs and Features menu.
- From the list of applications installed, right click on your installation of Fixed Asset Pro 16.
- Select Uninstall
- When the Windows UAC dialog box pops up, click on Yes.
- Follow the instructions on-screen.
- Open the Start menu and open Windows Settings.
- Click on Apps.
- From the list of applications installed, select your installation of Fixed Asset Pro 16, then select Uninstall.
- When the Windows UAC dialog box pops up, click on Yes.
- Follow the instructions on-screen.
-
Navigate to the folder where you have installed Fixed Asset Pro 16. By default, if you do not set the installation location, it will be in C:\Program Files (x86)\Fixed Asset Pro16.
Warning: If you do not know what you are doing, never touch any of the files inside the folder, unless if you are told to do so. - Run unins000.exe by double-clicking on it.
- If the Windows UAC dialog box pops up, click on Yes.
-
Follow the instructions on-screen.
Note: It is best to close the folder as leaving the folder open in the file explorer may prevent uninstallation.
The Basics #back to top
Congratulations, you have installed Fixed Asset Pro 16! Not only that, you have learned how to activate the software and log in! But what comes next?
To get used to the software, you will need to study how the software works. The next few pages should help you know how each component of the software works.
Refer back to the main page (link below) to see a list of the manuals of each component.
The Main Form #back to top

This is the main form. It is the application window that is most often manipulated by the user. As seen in the picture above, it shows several fixed assets of a certain company. When you start the application for the first time, the data shown is dummy data, meaning that it is only presented as an example. You can then add fixed asset data of your own company and remove the dummy data later.
A quick refresher: what is a fixed asset?
There are three types of assets of a company or establishment: fixed assets (the one we will be dealing with), current assets, and intangible assets.
A fixed asset is a physical asset of a company that the company does not intend to sell, and lasts for more than one fiscal year (also known as an accounting period). They are used as "tools" to help the company do their work. Examples include motorcycles owned by a restaurant for delivery of food, tables and chairs owned by an office for employee use, etc. These have their own accounts in the journal entries of a company, such as a "Motorcycle Account" for a motorcycle, and "Fixtures and Fittings Account" for fixtures and fittings of a company premises.
A current asset is an asset owned by a company that is intended for sale or be used up within the fiscal year. Examples include smartphones for sale from a smartphone manufacturer, food items from a restaurant, etc. It also includes assets the company plans to use up within the fiscal year, such as fuel for food delivery services, stationery such as pens that may run out of ink within the year, etc., as well as debtors. Items for sale are generally recorded as purchases, debtors generally have accounts with their name on it, and other current assets such as fuel and stationery are recorded as expenses. Cash in hand (recorded in the Cash Account), as well as cash at bank (recorded in the Bank Account) are also regarded as current assets.
Do note that the same item may not necessarily receive the same classification between multiple companies. A delivery van is considered a fixed asset for a company that makes frequent delivery of their products, but it is considered a current asset for a company that sells delivery vans.
Finally, an intangible asset is a non-physical asset of some value to the company, such as goodwill and copyrights of their products.
The word "asset" or "assets" (without indication of their type) in this manual should be taken to mean fixed assets, unless otherwise stated.
Using the main form
If you double-click any asset in the main form, you will be shown a dialog box detailing the information regarding the asset, such as purchase information, service information, and depreciation methods used.
The sections below detail each menu's functions, and each can be accessed by clicking on the corresponding button in the main form.
ReplicateThis menu is used to replicate an existing asset. If you have several identical assets, this menu will save you the time needed to input identical descriptions for them.
Add AssetWhat about adding assets that are not identical to any asset in your company? Add them using the Add Asset menu.
TransactionDispose, revalue, write-off or transfer any asset here. Appropriate journal entry will automatically be generated by the system.
Service LogIf an asset requires service maintenance (such as electronic equipment or motor vehicles), view and add any service history logs of the asset here.
DepreciationTo view the depreciation of your assets, you can view it here. This menu calculates depreciation online, and can be used to see depreciation in terms of a commercial period or fiscal period. There are multiple depreciation methods that can be used. These involve several complicated formulae, but you can simulate its effects using the software:
- * Non-depreciable: the asset will not be subjected to depreciation.
-
* Straight-line (s/l): the residual/scrap value of the asset is assessed. Then, the annual depreciation is calculated as follows:
\[D_n = {{V_0 - V_t}\over t}\]
where \(D_n\) represents the annual depreciation, \(V_0\) represents the asset's purchasing value, \(V_t\) represents the asset's residual value, and \(t\) represents the asset's estimated lifespan, in years. The resulting effect is that the book value will decrease linearly (i.e. by a fixed value) per year, hence the name of the method:

The system supports both straight-line and annualized straight-line methods. -
* Declining balance: also known as reducing balance (r/b) or diminishing balance, the value of the fixed asset will decrease by a certain fraction of its book value. This is given by the formula:
\[D_n = V_nr = V_0r^{n + 1}\]
where \(D_n\) represents the depreciation at year \(n\) of the asset's lifespan, \(V_n\) represents the asset's current book value, \(r\) represents the rate of depreciation, \(0 < r < 1\). The book value of the asset at a given point of time will be given in the following formula:
\[V_n = V_0r^n\] where \(V_0\) is the asset's purchasing value, and \(n\) is the number of years the asset has been used.
Using this method of depreciation will cause the depreciation in the first few years of the asset's lifespan to be much greater than the latter years as it causes an exponential decay of the book value:

The system supports fixed declining balance, declining balance with percentage, as well as double-declining balance. -
* Sum of year digits: Calculation is as follows:
\[D_n = \left({{t - n + 1}\over{\displaystyle\sum\limits_{i = 1}^t i}}\right)V_n = \left({{t - n + 1}\over{\displaystyle\sum\limits_{i = 1}^t i}}\right)^{n + 1}V_0\]
Again, \(D_n\) refers to the depreciation at year \(n\) of the asset's lifespan, \(t\) refers to the asset's lifespan, \(n\) refers to the number of years the asset has been in use.
The book value at year \(n\) is given as follows: \[V_n = \left({{t - n + 1}\over{\displaystyle\sum\limits_{i = 1}^t i}}\right)^nV_0\] where \(V_0\) refers to the asset's purchasing value. The following shows the decay of the book value as time passes:
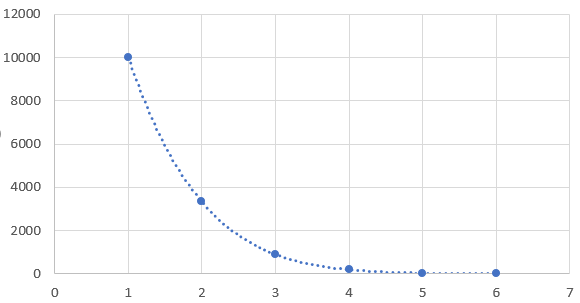
The system supports this method based on either the fiscal year or full year.
You can view and edit when an asset needs servicing or when does its warranty expire here.
SetupYou can set when your company's fiscal year starts, as well as the fixed asset acquisition date. Note that changing the settings here will greatly affect depreciation calculation, so make sure your settings are correct.
JournalThis will automatically generate the appropriate general journal entries. There is an option to print the journal entries out if you wish.
SummaryThis will summarize the depreciation of your assets.
ExitCloses the form.
Search AssetIf you have lots of fixed assets in your company, you can use this search function to save time to find an asset. Just type the name or part of the name of the asset and the system will search it for you.
Filtering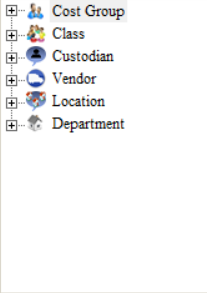
The leftmost pane allows you to select categories of assets to filter the list. It can filter assets based on cost group, class, custodian, vendor, location and department. Click on the expand buttons (labeled "+") in this menu to select a category to filter the list.
Top Quick Links #back to top
Aside from a set of quick links previously mentioned in the previous sections, there is a shortcut menu that is located in the upper right corner of the application's main window of Fixed Asset Pro 16.
List of menus
Asset TreeviewAs mentioned in the Quick Links section, this menu will bring back the main form of the application.
Export to ExcelPlease refer to the Importing and Exporting Data to and from Microsoft Excel section
Report ShortcutThis opens the Reports tab on the menu bar (will be explained later).
To-do ListThis menu is identical to the one we previously encountered in the Main Form. Refer to the corresponding section in the Main Form section.
Asset inquiryView the list of assets and their service history here.
SetupThis menu is identical to the one we previously encountered in the Main Form. Refer to the corresponding section in the Main Form section.
Operation #back to top
The Operation quick link menu consists of several menu links. Most of them are similar to what is seen in the main form, so this section will only cover differences from the main form.
List of menus
AcquisitionsThis menu is similar to the main form, where it lists your assets in the menu. You can also edit and add assets in a similar fashion as in the main form. However, unlike the main form, you can filter assets based on status, i.e. whether they are unposted, posted, or deleted.
Import asset from MS ExcelThe system provides an excellent and less time-consuming way to input your data – using a Microsoft Excel spreadsheet. This will be covered later in the Importing and Exporting Data to and from Microsoft Excel section.
Other menusAll other menus function identically to its corresponding menu function in the main form. Please refer to the Main Form section for more information.
Register #back to top
You can create and edit cost groups as well as automatically group your assets based on acquisition/transaction dates with the tools found in the Register quick link toolbar.
List of menus
Cost GroupCreate your cost groups/cost centers for your asset. This will be useful to classify your assets according to ther cost group for journaling purposes. You would need basic accounting background to setup the chart of account related.
Asset RegisterThis tool provides automated asset grouping. You can view all your assets and filter them based on:
- * Whether they are acquired this year
- * Whether they are acquired last year
- * Whether they are transacted this year
- * Whether they are transacted last year
This is a tool in which you can create your own chart of accounts of your company. Note that basic accounting knowledge is necessary, but you can opt to use your existing account number. This complete chart of accounts is the extension of ExcelAcc Business Solution. If you like, you may also print it out using the print function provided.
Card File #back to top
Set asset custodian, location, department, class, service, provider, tables, etc. here. There is also a master table that must be set first before you insert asset data. This data is the data that will be a reference when you input asset data.
List of menus
Master SetupThis is a menu where you can view all the asset custodians, locations, departments, classes, services, providers, etc. You can also edit, add and delete any of these data here.
CustodianSet your asset custodians here. An asset custodian is a department or person who in charge of the assets. They are specialized financial institutions responsible for safeguarding a firm's or individual's financial assets. You may use common labels such as department names or employee names here.
VendorYou may manage vendors of your fixed assets here. These may be firms, companies or establishments that you have previously bought your fixed assets.
LocationYou may list down locations where your fixed assets are located here.
ProviderHere, you list down information regarding a provider, such as a person or institution that can provide service, maintenance as well as purchase of assets.
DepartmentThis menu is to list down your company's departments so that you can group your assets based on department.
ClassHere, you classify your assets (e.g. whether they are considered computers, fixtures and fittings, motor vehicles, etc.)
Top Quick Links #back to top
Aside from a set of quick links previously mentioned in the previous sections, there is a shortcut menu that is located in the upper right corner of the application's main window of Fixed Asset Pro 16.
List of menus
Asset TreeviewAs mentioned in the Quick Links section, this menu will bring back the main form of the application.
Export to ExcelPlease refer to the Importing and Exporting Data to and from Microsoft Excel section
Report ShortcutThis opens the Reports tab on the menu bar (will be explained later).
To-do ListThis menu is identical to the one we previously encountered in the Main Form. Refer to the corresponding section in the Main Form section.
Asset inquiryView the list of assets and their service history here.
SetupThis menu is identical to the one we previously encountered in the Main Form. Refer to the corresponding section in the Main Form section.
Importing and Exporting Data to and from Microsoft Excel #back to top
When you first use this application, you have to input your fixed asset data to the application. However, if you have large numbers of fixed assets, inputting data may be very tedious. Fortunately, the application provides a convenient way to input your data, which is importing from Microsoft Excel.
Please note that the recommended file format for this application is the 97-2003 version of Microsoft Excel (with file extension *.xls).
Importing from Excel
- Select Import Asset from MS. Excel from the main window or from the Utility tab of the main menu.
- When the new window pops up, click on Export Template. This will download a template for you to fill your data in.
- Click the Next button (located above the Exit button, in the form of a right arrow) for the second step.
- Enter your fixed asset data to the excel template and save it to a convenient location.
- Click the Next button again for the next step.
- Click Get Asset Data file.
- Select the Excel spreadsheet that you have inputted the fixed asset data in. Once the process finishes, the summarized translated data from the spreadsheet will apopear.
- Click on the Next button.
- For some of the data associated with the data of other assets such as Asset Group, Location, Department, Custodian, Vendor, Class and Account Number, you can change them in the resulting window by clicking on its column. Data shows "EMPTY" because your excel file does not match the data in the application. Please select the combo dropdown list to select the data.
- Click on Process. A dialog box will appear to indicate a successful data input. Press OK to dismiss the dialog box.
Exporting to Excel
- Select Export to Excel quick link near the top of the window.
- Enter the file name for the new Excel file, select its directory, and press OK.